Showing posts with label crafts. Show all posts

Apr 3, 2013

Upcycled Kids Poncho

We've been getting some warm days around these parts. Around low 60s for the high..pretty dang nice. Man, but once that sun starts to set or clouds cover the sun for just a bit you can feel that chilly, mountain breeze. Its so tricky because I want to take out the dollies' summer clothes, but you know right around the corner it's probably going to snow! Crazy Utah weather :(

Anywhoo.. I was organizing my garage on one of those nice, sunny afternoons and found a hoodie I was going to donate and decided to upcycle it into something I've been wanting to try. It's nice and cozy and smooth on the inside, but was just a bit to short my my liking.  Deconstructing it a bit and adding a little bit here and there it turned into this!

 
Cute huh? She looks so cozy in it:) Its perfect for those cool evenings and was oh so easy to make!
Here's how I did it:
 
I started with a plain adult hoodie. Size small used here which made a size 2T/3T poncho.
 
 
Next I cut off the arms, pulled out the drawstring of the hood and, cut off the bottom about 3 inches to make it shorter. Didn't hem it because the fleece doesn't fray.


Didn't take pictures of these steps.
  • I seam ripped the kangaroo pocket the positioned it higher so her little hands could fit in it.
  • Sewed up the sides from where I cut the arms off then made slits on the sides where her arms would go.
  • Used embroidery thread to blanket stitch the edges of the slits to make it look more finished.
  • Turned hoodie part inside out then sewed it smaller to fit her head and used the original hem as a guide.
  • Cut a slit does the neck and blanket stitched with embroidery thread for extra detail. Then added a little more design to the pouch by embroidering more around the edges, but used white thread to stand out.
  • Still felt like it needed a little more oomph so I added lining to the hood with some vintage, floral fabric.
And that was it! New poncho!
 
 
Aww look at that grumpy little face. She was upset because I wouldn't let her climb on those rocks..crazy girl! She still looks super cute though ;o)
 
 
I love that fabric and I'm sad I'm running out boo! But at least its getting some use out of it.
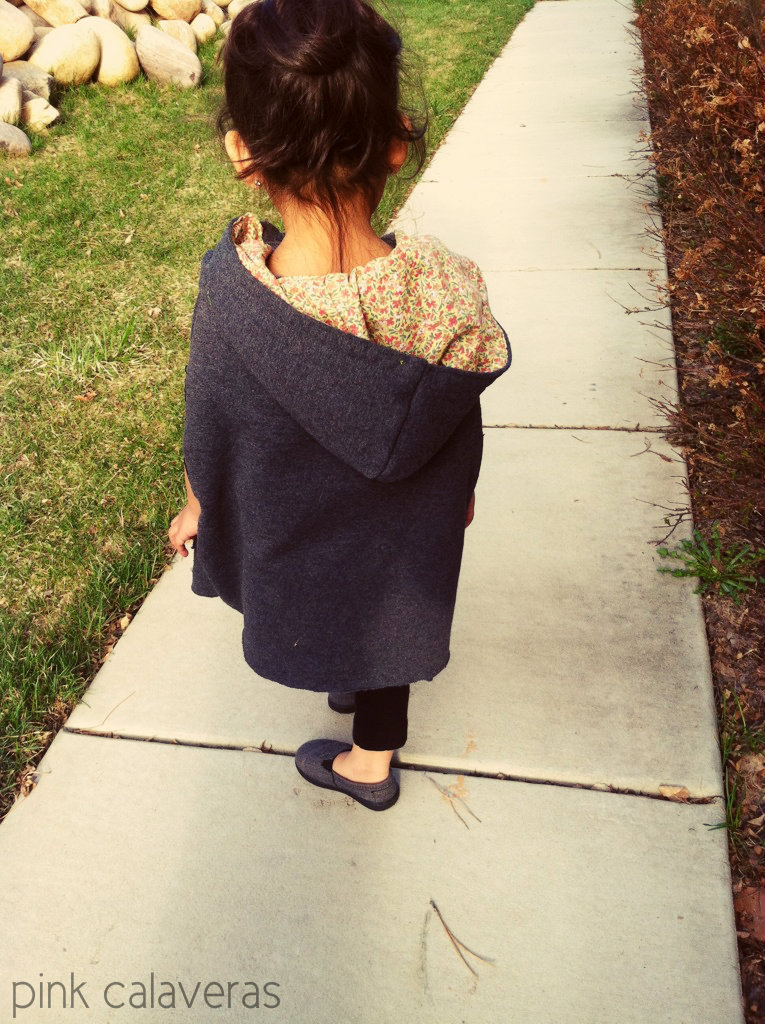
 
 
I love how easily she can just throw it on now I need to make one for big dolly, but I'm probably going to need to buy a large adult hoodie. I can just see them wearing them on a cool night by a campfire:) Man now I want one too! hehe
 
Thanks for stopping by!
 
xo
Georgette


Mar 22, 2013

DIY Polkadot Stool

Have you guys been crazy over the gold sharpie madness like I have?? I've seen so many cute ideas on how to use a gold sharpie all over pinterest.


Well I thought if you can decorate dishware, walls and even your nails why not some furniture? It's easy, adorable,cheap, and doesn't take long to dry! So that's when I decided to attack my little ikea stool with some sharpie polka dots:)


I picked up this little stool for 14.99 at Ikea and you can find it here. Being the 4"11 shrimp I am I use it for EVERYTHING! I had painted it white before to brighten it up a bit.


So first you start with your supplies.
 
 
The hole punch I used is a size 1.5", but you could easily trace a bottle cap or something that has the size circle you want.
I just hole punched a piece of a cereal box then got to tracing.
 
 
I didn't strategically place them. I just eyeballed on what looked cool and confetti like.
Then just colored them in. This part was fun, but tricky making sure I didn't go outside the lines so be careful!
 
 
Just take your time and have fun. For only costing about $2 for the sharpie it was a nice, distracting craft.
I've been househunting lately which hasn't been as much fun as I hoped so it was nice to take my mind of it for awhile.
 
So why don't you add some polkadots to your life? Promise it will make ya feel better;)
 
 
*hugs*
Georgette


Mar 3, 2013

Put a Doily On It!

I love doilies. They are feminine and sweet. I love all the work and detail put into them. And they are so easy to find(and cheap)! Thrift stores, garage sales.. or your grandma;)  They are real treasures, but they can be more than just throwing them in odd places or under items.
Over the years I've found myself sticking them everywhere. Here are a few ideas on how I use them in my home.


To snazz up a simple mousepad I just stuck on a doily. You can sew it or modpodge it, but I just placed it on there and it doesn't wiggle around. Super easy!


How about some instant art? I modpodged these paper doilies to a blank canvas and voila!


Dress up a naked window with a doily garland! I picked up a bag of these little beauties for a buck at the thrift store. I just sewed them all together and hung them up!


To make my little girls bed more girly I just sewed one onto a throw pillow. 10 minutes to happier pillowcases:)


It really doesn't take much time or money for that matter to dress up your home.  These little handmade treasures make everything happy!
 
Now go and put a doily on it! ;)
 
*hugs*
Georgette


Jan 23, 2013

crazy for finger knitting

I have always been a bit in love with the art of crocheting and knitting. I love thrifting or seeing all the time, work, and love put into projects like that. It's such a beautiful craft that not many do anymore, but has become a bit more popular. I've tried my hand at both, but sadly could not get it down. I stumbled upon finger knitting on pinterest and after seeing photos of young children getting the hang of it I thought it should be easy enough!
Well it was pretty dang easy after 10 minutes of throwing myself into it and I must admit it is SO ADDICTING! My 6 year even figured it out and made herself a little knitted headwrap and scarf!


I want to share this little craft with you and attempt to make a tutorial to teach you as well. I love the quiet time my daughter and I had together. With us kinda being stuck indoors with all the snow it calms her when she's a little restless.
So here we go..

  • Step1: start by grabbing your yarn over your palm and holding the tail with your thumb

 
  • Step 2: wrap around pinkie then come back again around your middle finger under ring finger and over pinkie.
 
  • Step3:  come back around pinkie over ring finger, under middle around index. This is the bottom row.

 
  • Step 4: to make the second row on top you go under middle,over ring, around pinkie, under ring again, over middle and around index. See now 2 rows!

 
Step 5: your going to grab the bottom row and stick your ringer through the top row starting from the pinkie.


See now you have one row again so your gonna do Step 4 to make that second row and repeat pulling the bottom row over your finger to make your chains. After about 4 times doing this you should already see a little chain forming.
 
 
That's it! I takes approximately the time of a movie to make a big chunky scarf and I love that I don't have to count rows or chains. It's just a nice Sunday afternoon craft to keep little hands busy:)
She loves em!


And so do I!
 
 
Add a little brooch? Don't mind if I do!
 
 
Or wrap it around your head like my dolly.
 
 
Hoped this little tutorial helped and you love it as much as I do!
 
Thanks for visiting:)
 
*hugs*
Georgette


125

Dec 17, 2012

Christmas Bordom Buster

Supplies needed:
 
Popsicle sticks
glue
acrylic paint
string
2 bored dollies;)
 
We had a really heavy snow this weekend. It was so cold out all we wanted to do was cuddle and watch movies. Well..only my husband and I wanted to bum around. My two dollies get bored really easily. Arts and crafts are the only things that keep them still and calm. So while making some yummy, warm stew I scattered glue and sticks on the dining table and told them to make me the prettiest snowflakes they could make! I remember seeing these stick snowflakes on the CraftyNest.
Can you tell whose is whose? :o)


After the paint dried I just strung them with string and pinned them to the wall. It was a VERY bare strip of wall and I don't mind displaying their cute wall art. As I was standing on top of the stool hanging these, praying I didn't fall, I had a very strong feeling of gratitude for my children. Children make the holidays glow. Its the little things.
 
 
Now go and look in your craft corner for anything to keep your kids entertained while making dinner. Trust me they'll be happy with anything:)
 
Thanks for stopping by!
 
*hugs*
Georgette


Dec 10, 2012

Barbie Storage Tutorial

At times I get really overwhelmed when toys are all over the place. I have a 2 and 6 year and I know it is inevitable for a tornado of a mess to happen 5 minutes after I picked up the whole house ha! I try to teach the girls designated areas that are for specific toys like here and here. And it does seem to help. Well their tiny best friends that they love to play with were crying for a space of their own and that's when this little cutie was born...


These are the materials used:
  • 1 solid back cotton lining 18"x24"
  • 1 solid front lining 18"x24" (I used felt because that's what I had on hand and it was semi sturdy so I wouldn't have to use interfacing)
  • 2 printed cotton for pockets 20"x18"
  • pants hanger
  • small strip of hook&loop or velcro
  • sewing machine
  • pins
I wanted it to resemble a shoe organizer, but I wanted to use cute fabrics.
I had bought this fabric last spring from IKEA and it was just collecting dust and I thought this was the perfect project. I thought the print looked very 60s. I also thrifted the vintage wooden pant hanger for .75 cents and thought it would work perfectly!
 
Here's a general idea how I put this together.
 
 *don't mind that middle crease/line that's where I sewed 2 strips together to made one large piece
**I forgot to photograph this step: after pinning and sewing down pockets mark off  6" twice then sew a straight line down. These create the pockets!


It took about a hour including the ironing, pinning, and sewing which wasn't too bad.
Then it was time to put those girls in their new home!


Nice and simple. My kinda project.
It would make a nice gift too. And maybe a few homemade Barbie dresses like these would be cute too!


I found a really easy tutorial here for those.
Hopefully the dolls go back here when they're done;)
 
Thanks for stopping by!
 
*hugs*
Georgette


Nov 13, 2012

Tree of Thankfulness

For few years now I've always wanted to do a project that documented what we are thankful for every year.
Now that my oldest is beginning to understand what it is to be thankful I knew it was time.
I've seen numerous ways on the web like a chalkboard list, writing on turkey feathers, but I decided to do a traditional thankful tree.
Just branches, a vase, construction paper, and clothespins.
 
 
For the past few weeks when the temperatures were a bit nicer to us I began collecting fallen branches when I would drop off or pick up my daughter from school. I'm sure my neighbors thought I was a coo-coo hoarder...well maybe I am a bit;)
I just knew it would look so pretty and simple.
And it was all free and stuff I had on hand.
The girls had fun cutting and writing down what they were thankful for.


Well I think my little one just had fun getting to cut and scribble.


We have PLENTY to be thankful for.
 
 
It's small moments like this that make us appreciate each other more.


And I'm thankful for you taking the time to visit my blog:)
 
*hugs*
 
Georgette


Aug 30, 2012

Cheap DIY Art Carousel

I seem to be having the biggest problem with my dog lately. When I go outside to pick up his naughty poops I find heaps of crayon bits in them! Sorry TMI I know! Its just so freakin frustrating to finally find out where all the crayons are disappearing to! So I figured if I made a designated area for all daily art supplies then my gross curious little dog won't easily find his favorite colored, waxy snack.
 
Thats when this little helper came in the picture:
 
 
This was a total last minute project. Which means I didn't go out and buy anything. I had the plastic lazy susan ( that I got for a $1 at Honks) in my craft room and I wasn't really using it. Mod Podged some vintage fabric that I thrifted to it.
 
The aluminum cans were old peanut cans that I was saving for I don't know what reason! Sheeesh once you become a crafter it ultimately means you are a hoarder too! Anywhoo I just modpodged some leftover scrapbooking paper to those two.
 
The yellow, plastic vintage mugs I thrifted for my girls to play with in their kitchen. They have so much play pots and dishes I figures I could use em:)
 
Pretty easy and fits all there little art supplies.
 
 
Once I set it out they were excited to get started:)
 
 
Fits nice and perfect on this little shelf that I rescued and painted. Can you believe this shelf used to be one of those cheesy, black laminated shelves?
 
 
Take that Toby! No more crayons for you!;o)
 
Thanks for dropping by!
 
xo
Georgette